ノート
最後へ移動して完全なサンプルコードをダウンロードしてください。または、Binder経由でブラウザでこのサンプルを実行してください
オイラー数#
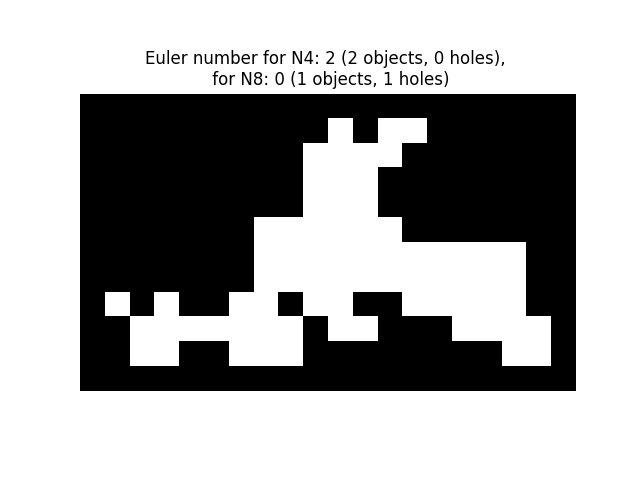
この例では、2Dおよび3Dオブジェクトにおけるオイラー数[1]の計算を示します。
2Dオブジェクトの場合、オイラー数はオブジェクトの数から穴の数を引いたものです。オブジェクトに対して8連結ピクセル(2連結)の近傍が考慮される場合、これは補集合(穴、背景)に対して4連結ピクセル(1連結)の近傍を考慮することになり、逆もまた同様であることに注意してください。skimage.measure.label()を使用してオブジェクトの数を計算し、2つの数の差から穴の数を推測することもできます。
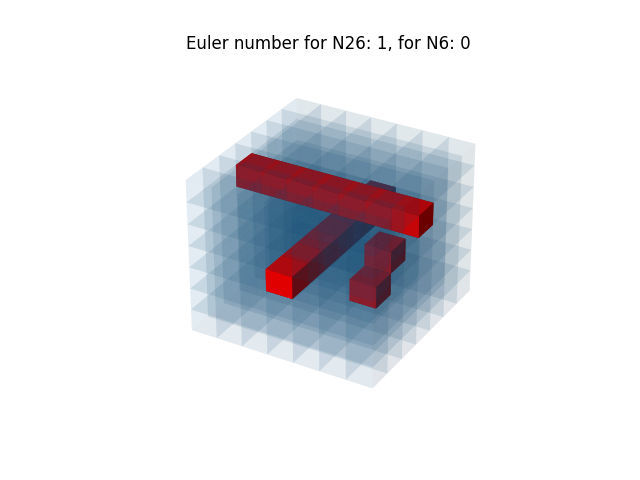
3Dオブジェクトの場合、オイラー数はオブジェクトの数に穴の数を足し、そこからトンネルまたはループの数を引いたものとして求められます。オブジェクトに3連結(周囲の26個のボクセルをその近傍とみなす)を使用する場合、これは補集合(穴、背景)に1連結(特定のボクセルに対して6つの近傍のみを考慮する)を使用することに対応します。ボクセルはここでは青色の透明な面で表されます。内部の気孔は赤で表されます。
from skimage.measure import euler_number, label
import matplotlib.pyplot as plt
import numpy as np


# Sample image.
SAMPLE = np.array(
    [
        [0, 0, 0, 0, 0, 0, 0, 0, 0, 1, 0, 1, 1, 0, 0, 0, 0, 0],
        [0, 0, 0, 0, 0, 0, 0, 0, 1, 1, 1, 1, 0, 0, 0, 0, 0, 0],
        [0, 0, 0, 0, 0, 0, 0, 0, 1, 1, 1, 0, 0, 0, 0, 0, 0, 0],
        [0, 0, 0, 0, 0, 0, 0, 0, 1, 1, 1, 0, 0, 0, 0, 0, 0, 0],
        [0, 0, 0, 0, 0, 0, 1, 1, 1, 1, 1, 1, 0, 0, 0, 0, 0, 0],
        [0, 0, 0, 0, 0, 0, 1, 1, 1, 1, 1, 1, 1, 1, 1, 1, 1, 0],
        [0, 0, 0, 0, 0, 0, 1, 1, 1, 1, 1, 1, 1, 1, 1, 1, 1, 0],
        [1, 0, 1, 0, 0, 1, 1, 0, 1, 1, 0, 0, 1, 1, 1, 1, 1, 0],
        [0, 1, 1, 1, 1, 1, 1, 1, 0, 1, 1, 0, 0, 0, 1, 1, 1, 1],
        [0, 1, 1, 0, 0, 1, 1, 1, 0, 0, 0, 0, 0, 0, 0, 0, 1, 1],
    ]
)
SAMPLE = np.pad(SAMPLE, 1, mode='constant')

fig, ax = plt.subplots()
ax.imshow(SAMPLE, cmap=plt.cm.gray)
ax.axis('off')
e4 = euler_number(SAMPLE, connectivity=1)
object_nb_4 = label(SAMPLE, connectivity=1).max()
holes_nb_4 = object_nb_4 - e4
e8 = euler_number(SAMPLE, connectivity=2)
object_nb_8 = label(SAMPLE, connectivity=2).max()
holes_nb_8 = object_nb_8 - e8
ax.set_title(
    f'Euler number for N4: {e4} ({object_nb_4} objects, {holes_nb_4} '
    f'holes), \n for N8: {e8} ({object_nb_8} objects, '
    f'{holes_nb_8} holes)'
)
plt.show()
3-Dオブジェクト#
この例では、3Dキューブを生成し、その後、穴とトンネルを追加します。オイラー数は6および26近傍構成で評価されます。このコードはhttps://matplotlib.org/devdocs/gallery/mplot3d/voxels_numpy_logo.htmlに触発されています。
def make_ax(grid=False):
    ax = plt.figure().add_subplot(projection='3d')
    ax.grid(grid)
    ax.set_axis_off()
    return ax


def explode(data):
    """visualization to separate voxels

    Data voxels are separated by 0-valued ones so that they appear
    separated in the matplotlib figure.
    """
    size = np.array(data.shape) * 2
    data_e = np.zeros(size - 1, dtype=data.dtype)
    data_e[::2, ::2, ::2] = data
    return data_e


# shrink the gaps between voxels


def expand_coordinates(indices):
    """
    This collapses together pairs of indices, so that
    the gaps in the volume array will have a zero width.
    """
    x, y, z = indices
    x[1::2, :, :] += 1
    y[:, 1::2, :] += 1
    z[:, :, 1::2] += 1
    return x, y, z


def display_voxels(volume):
    """
    volume: (N,M,P) array
            Represents a binary set of pixels: objects are marked with 1,
            complementary (porosities) with 0.

    The voxels are actually represented with blue transparent surfaces.
    Inner porosities are represented in red.
    """

    # define colors
    red = '#ff0000ff'
    blue = '#1f77b410'

    # upscale the above voxel image, leaving gaps
    filled = explode(np.ones(volume.shape))

    fcolors = explode(np.where(volume, blue, red))

    # Shrink the gaps
    x, y, z = expand_coordinates(np.indices(np.array(filled.shape) + 1))

    # Define 3D figure and place voxels
    ax = make_ax()
    ax.voxels(x, y, z, filled, facecolors=fcolors)
    # Compute Euler number in 6 and 26 neighborhood configuration, that
    # correspond to 1 and 3 connectivity, respectively
    e26 = euler_number(volume, connectivity=3)
    e6 = euler_number(volume, connectivity=1)
    plt.title(f'Euler number for N26: {e26}, for N6: {e6}')
    plt.show()


# Define a volume of 7x7x7 voxels
n = 7
cube = np.ones((n, n, n), dtype=bool)
# Add a tunnel
c = int(n / 2)
cube[c, :, c] = False
# Add a new hole
cube[int(3 * n / 4), c - 1, c - 1] = False
# Add a hole in neighborhood of previous one
cube[int(3 * n / 4), c, c] = False
# Add a second tunnel
cube[:, c, int(3 * n / 4)] = False
display_voxels(cube)
スクリプトの合計実行時間:(0分1.065秒)